Search This Blog

2020-09-19

LAB 07 : Manage Azure Storage

 1.     Deploy a azure VM

Upload \Allfiles\Module_07\az104-07-vm-template.json and \Allfiles\Module_07\az104-07-vm-parameters.json and run the following commands

$location = 'eastus'

$rgName = 'az104-07-rg0'

New-AzResourceGroup -Name $rgName -Location $location

New-AzResourceGroupDeployment `
   -ResourceGroupName $rgName `
   -TemplateFile $HOME/az104-07-vm-template.json `
   -TemplateParameterFile $HOME/az104-07-vm-parameters.json `
   -AsJob


2.    Create and configure Azure Storage accounts

In the Azure portal, search for and select Storage accounts, and then click + Add.

Choose default option for Networking
Choose default option for Advanced

Upgrade Storage account to  StorageV2 (general purpose v2).


When the replication is RA-GRS, check the storage account endpoints and it will contain both primary and secondary endpoints


Change the replication to GRS
Now, if you check Geo replication, it will contains only the primary endpoints
Change the replication to LRS

Check the GEO replication endpoints, it will contains only the primary endpoints

Change the access tier to cool.The cool access tier is optimal for data which is not accessed frequently.

3. Create a blob container and upload a blob into it.
In the Blob service create a new container


Upload the license in the newly created container within a folder license


On the licenses/LICENSE blade, review the available options.
 You have the option to download the blob, change its access tier (it is currently set to Hot), acquire a lease, which would change its lease status to Locked (it is currently set to Unlocked) and protect the blob from being modified or deleted, as well as assign custom metadata (by specifying an arbitrary key and value pairs). You also have the ability to Edit the file directly within the Azure portal interface, without downloading it first. You can also create snapshots, as well as generate a SAS token (you will explore this option in the next task).

4. Manage authentication and authorization for Azure Storage
Will configure authentication and authorization for Azure Storage.

Copy the URL of the License
If you try the URL in other browser, you will see the XML containing the message "ResourceNotFound". This is expected, since the container you created has the public access level set to Private (no anonymous access).

Configure Generate SAS with the following values
ettingValue
PermissionsRead
Start dateyesterday's date
Start timecurrent time
Expiry datetomorrow's date
Expiry timecurrent time
Allowed IP addressesleave blank
Allowed protocolsHTTP
Signing keyKey 1


Copy the Blob SAS URL and open it in another browser and you can see or able to download the license file
This is expected, since now your access is authorized based on the newly generated the SAS token.


Click on "Switch to Azure AD User Account"
At this point, you no longer have access to the container.

click Access Control (IAM).


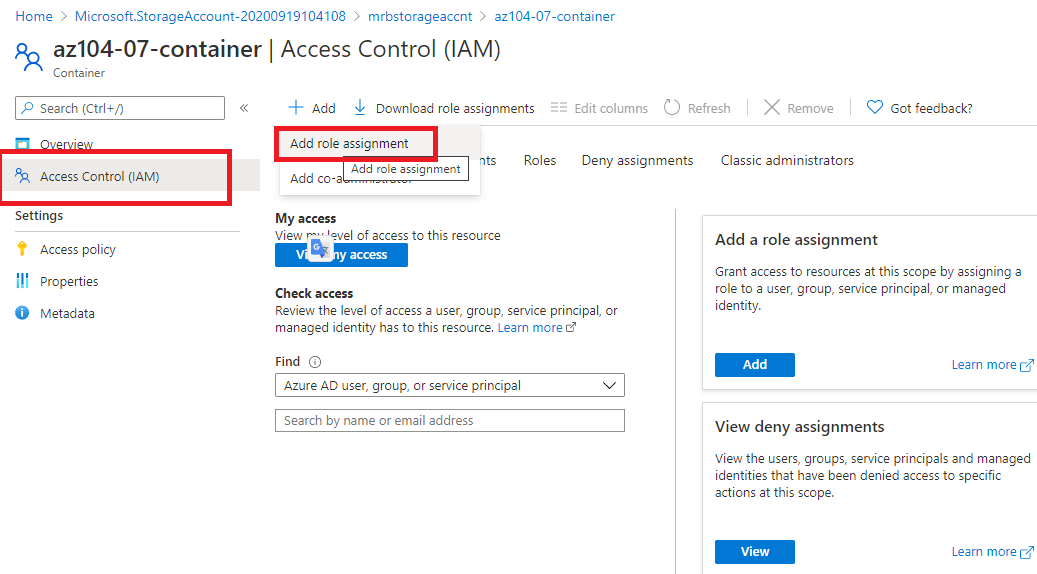
On the Add role assignment blade, specify the following settings:

  1. SettingValue
    RoleStorage Blob Data Owner
    Assign access toAzure AD user, group, or service principal
    Selectthe name of your user account


Now you would be able to Switch to Azure AD Account or switch back to Access Key
5. create and configure Azure Files shares
Go to the storage account you created in the first task of this lab and, in the File service section, click File shares and Create a new file share


Create connect to the newly created file share

Click Copy to Clipboard
Open the VM created in Step 1 and run the powser shell script with the copied text


Once done, Replace the content of the PowerShell Script pane with the following script and click Run:
New-Item -Type Directory -Path 'Z:\az104-07-folder'

New-Item -Type File -Path 'Z:\az104-07-folder\az-104-07-file.txt'
Navigate back to the az104-07-share file share blade, click Refresh, and verify that az104-07-folder appears in the list of folders. Click az104-07-folder and verify that az104-07-file.txt appears in the list of files.


6.    Configure network access for Azure Storage.
In the Azure portal, navigate back to the blade of the storage account you created in the first task of this lab and, in the Settings section, click Firewalls and virtual networks.


Open another browser window by using InPrivate mode and navigate to the blob SAS URL you generated in the previous task.
You should be presented with the content of The MIT License (MIT) page.
This is expected, since you are connecting from your client IP address.

From the Cloud Shell pane, run the following to attempt downloading of the LICENSE blob from the az104-07-container container of the storage account (replace the [blob SAS URL] placeholder with the blob SAS URL you generated in the previous task):
Invoke-WebRequest -URI '[blob SAS URL]'

Verify that the download attempt failed.

Note: You should receive the message stating AuthorizationFailure: This request is not authorized to perform this operation. This is expected, since you are connecting from the IP address assigned to an Azure VM hosting the Cloud Shell instance.


Clean Up Resource
Get-AzResourceGroup -Name 'az104-07*' | Remove-AzResourceGroup -Force -AsJob


LAB 08 : VM Scaleset

 Objective : deploy Azure virtual machine scale set across availability zones by using the Azure portal.

1.    Create VM Scale Set


Accept Default Values in Disk


Networking - Create a Vnet

Edit Network interface and create a new inbound rule
Enable Public IP Address


Enable Load Balancer
Scaling -Set instance count and policy
Management - Ensure boot diagonistics is enable

Management - Create new diagnostics storage account
Health- Accept Default Values

Advanced - Spreading Algo : Fixed Spreading


2.    Configure Azure virtual machine scale sets by using virtual machine extensions

Objective: Install Windows Server Web Server role on the instances of the Azure virtual machine scale set you deployed in the previous task by using the Custom Script virtual machine extension.

Storage account- add a new container


Storage account- Upload the script
VM Scaleset Add Extensions - Custom Script Extension
Add the custom script extensions
Upgrade the VM instances


Validation
In the Azure portal, search for and select Load balancers and, in the list of load balancers, click az10408vmss0lb.


On the az10408vmss0lb blade, note the value of the Public IP address assigned to the frontend of the load balancer, open an new browser tab, and navigate to that IP address.


3. Scale compute and storage for Azure virtual machine scale sets
Change the size of virtual machine scale set instances, configure their autoscaling settings, and attach disks to them.


Upgrade the instances as oer the VM Scaleset

Scaling the VM Scale Set : -Custom autoscale and Scale based on a metric

Add the Rule for auto scaling

SettingValue
Metric sourceCurrent resource (az10480vmss0)
Time aggregationAverage
Metric namespaceVirtual Machine Host
Metric nameNetwork In Total
OperatorGreater than
Metric threshold to trigger scale action10
Duration (in minutes)1
Time grain statisticAverage
OperationIncrease count by
Instance count1
Cool down (minutes)

 
5

Set Instance Limit Values

Validation of auto scaling
$rgName = 'az104-08-rg02'

$lbpipName = 'az10408vmss0-ip'

$pip = (Get-AzPublicIpAddress -ResourceGroupName $rgName -Name $lbpipName).IpAddress
while ($true) { Invoke-WebRequest -Uri "http://$pip" }

Click refresh in the list of instances after few minutes and we can see maximum 3 instances


Attach a disk :- 

Save the change, in the Settings section of the az10408vmss0 blade, click Instances, select the checkboxes next to the two instances of the virtual machine scale set, click Upgrade, and then, when prompted for confirmation, click Yes.


The disk attached in the previous step is a raw disks. Before it can be used, it is necessary to create a partition, create a filesystem, and mount it. To accomplish this, you will use Azure virtual machine Custom Script extension. First, you will need to remove the existing Custom Script Extension.

Uninstall the custom script extensions


In the azure power shell, click the Upload/Download files icon, in the drop-down menu, click Upload and upload the file \Allfiles\Labs\08\az104-08-configure_VMSS_disks.ps1 into the Cloud Shell home directory.

The content is as below
$rgName = 'az104-08-rg02'
$vmssName = 'az10408vmss0'
$vmss = Get-AzVmss `
-ResourceGroupName $rgName `
-VMScaleSetName $vmssName

$publicSettings = @{
"fileUris" = (,"https://raw.githubusercontent.com/Azure-Samples/compute-automation-configurations/master/prepare_vm_disks.ps1");
"commandToExecute" = "powershell -ExecutionPolicy Unrestricted -File prepare_vm_disks.ps1"
}

Add-AzVmssExtension -VirtualMachineScaleSet $vmss `
-Name "customScript" `
-Publisher "Microsoft.Compute" `
-Type "CustomScriptExtension" `
-TypeHandlerVersion 1.8 `
-Setting $publicSettings

# Update the scale set and apply the Custom Script Extension to the VM instances
Update-AzVmss `
-ResourceGroupName $rgName `
-Name $vmssName `
-VirtualMachineScaleSet $vmss


Run following commands

Set-Location -Path $HOME

Get-Content -Path ./az104-08-configure_VMSS_disks.ps1
./az104-08-configure_VMSS_disks.ps1
In the Settings section of the az10408vmss0 blade, click Instances, select the checkboxes next to the two instances of the virtual machine scale set, click Upgrade, and then, when prompted for confirmation, click Yes.

Delete all resources
Get-AzResourceGroup -Name 'az104-08*' | Remove-AzResourceGroup -Force -AsJob