Search This Blog

2009-10-31

Bind MSChart with Dataset and handle Click event of the chart

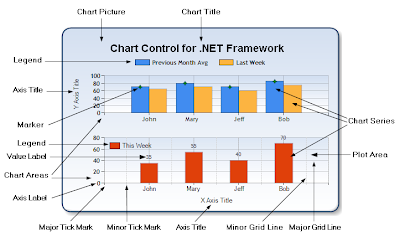
The MSChart control is an external ActiveX control that lets you add charting capabilities to your applications. You can create two- and three-dimensional charts in different styles, including bars, lines, and pies. You have complete control over all the items in the chart, such as title, legends, footnotes, axes, data point series, and so on. You can even rotate the graph, add backdrop images to virtually any element of the chart, set up your own light sources, and place them where you want.
This code shows you how to display information from a dataset in a chart using the MSChart control. A number of features of this control are illustrated.

System Setup:
Download the following component for MS Chart Control and install in your PC
1.Visual Studio 2008 Professional Edition (90-day Trial)
(http://www.microsoft.com/downloads/details.aspx?familyid=83C3A1EC-ED72-4A79-8961-25635DB0192B&displaylang=en)
2.Microsoft Visual Studio 2008 Service Pack 1
(http://www.microsoft.com/downloads/details.aspx?familyid=FBEE1648-7106-44A7-9649-6D9F6D58056E&displaylang=en)
3.Microsoft Chart Controls for Microsoft .NET Framework 3.5
(http://www.microsoft.com/downloads/details.aspx?FamilyID=130f7986-bf49-4fe5-9ca8-910ae6ea442c&displaylang=en)
4.Microsoft Chart Controls Add-on for Microsoft Visual Studio 2008
(http://www.microsoft.com/downloads/details.aspx?familyid=1D69CE13-E1E5-4315-825C-F14D33A303E9&displaylang=en)

Steps to create chart

Step 1:Create a website -
Create a new website in Visual studio 2008(File->New Website),choose the language C# and write the file name "testWebSite)


Step 2:Add Chart item to the toolbox -
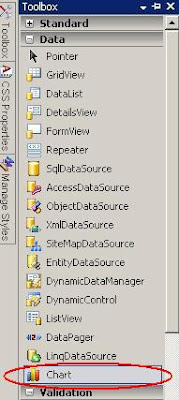
Open the toolbox ,Right click any tab(Here,I have choosen the Data tab), click on Choose Items


Browse the folder to your installation directory.By default it will install in C drive(OS installation drive).Go to C:\Program Files->Microsoft chart controls->Assemblies


Select "System.Web.DataVisualization.dll"


Select the checkbox against "Chart"


Check the web.config file that System.Web.DataVisualization.Design,System.Web.DataVisualization,System.Windows.Forms.DataVisualization.Design,System.Windows.Forms.DataVisualization comes under assemblies tag
<compilation debug="true">
<assemblies>
<add assembly="System.Core, Version=3.5.0.0, Culture=neutral, PublicKeyToken=B77A5C561934E089"/>
<add assembly="System.Web.Extensions, Version=3.5.0.0, Culture=neutral, PublicKeyToken=31BF3856AD364E35"/>
<add assembly="System.Data.DataSetExtensions, Version=3.5.0.0, Culture=neutral, PublicKeyToken=B77A5C561934E089"/>
<add assembly="System.Xml.Linq, Version=3.5.0.0, Culture=neutral, PublicKeyToken=B77A5C561934E089"/>
<add assembly="System.Web.DataVisualization.Design, Version=3.5.0.0, Culture=neutral, PublicKeyToken=31BF3856AD364E35"/>
<add assembly="System.Web.DataVisualization, Version=3.5.0.0, Culture=neutral, PublicKeyToken=31BF3856AD364E35"/>
<add assembly="System.Windows.Forms.DataVisualization.Design, Version=3.5.0.0, Culture=neutral, PublicKeyToken=31BF3856AD364E35"/>
<add assembly="System.Windows.Forms.DataVisualization, Version=3.5.0.0, Culture=neutral, PublicKeyToken=31BF3856AD364E35"/></assemblies>
</compilation>

And will come under the toolbox

Step 3:Design a chart in ASPX page
Now you can write the following code in your ASPX page or drag the chart control from toolbox to your aspx page.

<asp:Chart ImageType="Png" ID="Chart1" runat="server"
BackColor="#D3DFF0" Palette="BrightPastel" Width="412px" Height="296px" borderlinestyle="Solid" backgradientendcolor="White" backgradienttype="TopBottom"
BorderlineWidth="2" BorderlineColor="26, 59, 105"
OnClick="Chart1_Click">
<Titles>
<asp:Title ShadowColor="32, 0, 0, 0" Font="Trebuchet MS, 14.25pt, style=Bold" ShadowOffset="3"
Text="Demo Chart" Alignment="TopLeft" ForeColor="26, 59, 105">
</asp:Title>
</Titles>
<Series>
<asp:Series Name="Series1" XAxisType="Primary" XValueMember="Name" XValueType="Double"
YValueMembers="TotalCost" YValueType="Double" BorderColor="Brown" Color="SeaGreen"
ShadowColor="Yellow" ShadowOffset="1" ChartType="Column" YValuesPerPoint="4">
</asp:Series>
<asp:Series Name="Series2" XAxisType="Primary" XValueMember="Name2" XValueType="Double"
YValueMembers="TotalCost2" YValueType="Double" BorderColor="Brown" Color="Aqua"
ShadowColor="Yellow" ShadowOffset="1" ChartType="Line" YValuesPerPoint="4">
</asp:Series>
</Series>
<ChartAreas>
<asp:ChartArea Name="ChartArea1" BorderColor="Red">
</asp:ChartArea>

</ChartAreas>
<Legends>
<asp:Legend Enabled="true" Name="Default" LegendStyle="Table" BackColor="Transparent" Font="Trebuchet MS, 8.25pt, style=Bold">

<Position Y="90" Height="12" Width="18" X="0"></Position>
</asp:Legend>
</Legends>
<BorderSkin SkinStyle="Sunken"></BorderSkin>
</asp:Chart>

In this code,
<Titles> </Titles> defines the chart title.
<Series> </Series> defines the different type of series like line,pie,bar etc.A single chart contain multiple series .In our example I have taken two series: Series1 and Series2
Series1 is a column series which is defiend in the ChartType properties of that series.and the series2 is a line series mentioned in the charttype

In the series XValueMember and XValueType define which column of dataset it will bind with X Axis and the datatype of that column.
Similarly YValueMembers and YValueType define the member and data type of Y Axis.
In our example XValueMember,XValueType,YValueMembers,YValueType series1 are Name,Double,TotalCost and Double respectively.
and XValueMember,XValueType,YValueMembers,YValueType series2 are Name2,Double,TotalCost2 and Double respectively.

Legend properties of the chart defines the legend of the chart.
The chart has a different event that can be handled from the Server Side code.I have choose OnClick event(OnClick="Chart1_Click")
Rest of the properties are mostly define the appearance of the chart.
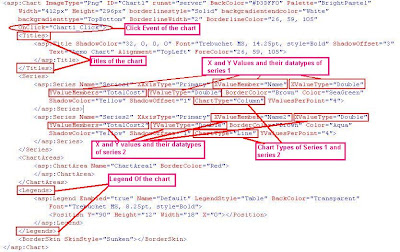


More Detail View


Take a asp:Label to display the chart event output.Put "lblValue" in the lable ID.

<asp:Label ID="lblValue" runat="server"<</asp:Label>

Step 4:Create dataset to bind the chart from server side:
Write the following code to create a dataset which will bind with the chart and the code to handle the click event.
We are passing the X axis values by #AXISLABEL,Y axis values by #VAL{C},series name by #SERIESNAME and the index of the chart by #INDEX to the click event

using System;
using System.Collections.Generic;
using System.Linq;
using System.Web;
using System.Web.UI;
using System.Web.UI.WebControls;
using System.Data;

public partial class _Default : System.Web.UI.Page
{
protected void Page_Load(object sender, EventArgs e)
{

this.Chart1.Series[0].PostBackValue = "<B>X :</B> #AXISLABEL;<B>Y :</B>#VAL{C};<B>Series Name :</B>#SERIESNAME;<B>Chart Index :</B>#INDEX";
this.Chart1.Series[0].ToolTip = "#AXISLABEL Name: #VAL{C}";

this.Chart1.Series[1].PostBackValue = "<B>X :</B> #AXISLABEL;<B>Y :</B>#VAL{C};<B>Series Name :</B>#SERIESNAME;<B>Chart Index :</B>#INDEX";
this.Chart1.Series[1].ToolTip = "#AXISLABEL Name: #VAL{C}";


//create a chart
DataSet ds = new DataSet();
DataTable objDataTable = new DataTable("PatientList");
DataSet objDataSet = new DataSet();
DataRow objDR;

objDataSet.Tables.Add(objDataTable);
objDataTable.Columns.Add("TotalCost", typeof(string));
objDataTable.Columns.Add("Name", typeof(string));
objDataTable.Columns.Add("TotalCost2", typeof(string));
objDataTable.Columns.Add("Name2", typeof(string));

objDR = objDataTable.NewRow();
objDR["Name"] = "10";
objDR["TotalCost"] ="11";
objDR["Name2"] = "5";
objDR["TotalCost2"] = "16";
objDataTable.Rows.Add(objDR);

objDR = objDataTable.NewRow();
objDR["Name"] = "11";
objDR["TotalCost"] = "12";
objDR["Name2"] = "18";
objDR["TotalCost2"] = "10";
objDataTable.Rows.Add(objDR);

objDR = objDataTable.NewRow();
objDR["Name"] = "12";
objDR["TotalCost"] = "15";
objDR["Name2"] = "15";
objDR["TotalCost2"] = "19";
objDataTable.Rows.Add(objDR);

objDR = objDataTable.NewRow();
objDR["Name"] = "13";
objDR["TotalCost"] = "18";
objDR["Name2"] = "11";
objDR["TotalCost2"] = "15";
objDataTable.Rows.Add(objDR);


Chart1.DataSource = objDataSet;
Chart1.DataBind();


}
protected void Chart1_Click(object sender, ImageMapEventArgs e)
{

lblValue.Text = String.Format("{0}", e.PostBackValue);
}

}

Step 5.Run your application by pressing F5 ,you can see the following output


Click on series of the chart,you can see that the label is changing with the data of that particular series.


I have tried a simple way of binding the chart with dataset.You can bind the chart with database table with the same way.You also can change the chart on the click event or navigate to a new page with the data of the click point.

2009-10-29

Silverlight with LINQ and WCF

Microsoft Silverlight is a cross-browser, cross-platform, and cross-device plug-in for delivering the next generation of .NET based media experiences and rich interactive applications for the Web.Silverlight applications are delivered to a browser in a text-based markup language called XAML.
On the otherhand,LINQ is a programming model that introduces queries as a first-class concept into any Microsoft .NET language.
Additionaly,WCF is a technology by which pieces of software can communicate with one another.
These three technologies (Silverlight,LINQ,WCF) are the future of .NET.So you can't go further avoiding thess new technologies.I have tried to describe the interoperability between Silverlight,LINQ and WCF.
In the following example, data are coming from Sql server table with the help of LINQ,then the data are exposed by WCF for the client and atlast it cosumed by Silverlight application.

This can be achived by the following steps :

1.Create table in Sql Server database.
2.Create a silverlight application.
3.Linq To SQL to retrive the data from SQL server Database to .NET application.
4.Create WCF Service to receive the data for Silverlight application.
5.Consume data from WCF and display it in the datagrid of a silverligt application.

Create table in Sql Server database.

Step 1.Open SQL server Management Studio.
Step 2.Create a new database .

Step 3.write the database name "MyTestDb"

Step 4.create a new table "tblMyTest" as follows.

Step 5.Insert Some data in that table


Create a silverlight application

For this go to Start->Select Vs2008->Select Project In File Menu->select->SivlerLight. Then Select SilverLightAppliction in Templete


Put "SilverligtTest"

Create a Silver light Project :-


Choose "Asp.net web application project" under "new web project type"


Click OK

VS2008 create two project under solution:
SilverligtTest
SilverligtTest.Web

Linq To SQL to retrive the data from SQL server Database to .NET application.

LINQ is a very powerful addition to both VB 9 and C# 3 and is likely to be a central technique for data retrieval for Silverlight and other .NET technology going forward.

To begin right click on the SilverligtTest.Web project and choosing Add, and then choose the LinqToSql Classes template.Name it "MyDataClasses.dbml"


When the Object Relational Designer window opens, open the Server Explorer and navigate to the "MyTestDb" database and drag the tblMyTest Tables onto the MyDataClasses.dbml Designer workspace.
next click design surface of dbml (MyDataClasses.dbml) change the property of Serilaization mode from None to Unidirectional.


Create WCF Service to recevie the data for Silverlight application:

Right click on the SilverligtTest.Web project and choose Add New and from the templates choose WCF Service.Put "MyService.svc" in the name.


Open the file, IMyService.cs which contains the contract that was created by Visual Studio 2008.Write a method "GetAllEmployee"

using System;
using System.Collections.Generic;
using System.Linq;
using System.Runtime.Serialization;
using System.ServiceModel;
using System.Text;


namespace SilverligtTest.Web
{
// NOTE: If you change the interface name "IMyService" here, you must also update the reference to "IMyService" in Web.config.
[ServiceContract]
public interface IMyService
{
[OperationContract]

List<tblMyTest> GetAllEmployee();

}
}


Having changed the contract in the interface, you must be sure to change the implementation in the .cs file.Open MyService.svc.cs.And implement the method GetAllEmployee
using System;
using System.Collections.Generic;
using System.Linq;
using System.Runtime.Serialization;
using System.ServiceModel;
using System.Text;

namespace SilverligtTest.Web
{
// NOTE: If you change the class name "MyService" here, you must also update the reference to "MyService" in Web.config.
public class MyService : IMyService
{


#region IMyService Members

public List<tblMyTest> GetAllEmployee()
{
//First create instance of DataClasses1
MyDataClassesDataContext db = new MyDataClassesDataContext();
var emp=db.tblMyTests;
return emp.ToList();

}

#endregion
}
}

Changes are required in web.config of SilverligtTest.Web

WCF uses wsHttpBinding as its default binding, now change it basicHttpBinding.
<services>
<service behaviorConfiguration="SilverligtTest.Web.MyServiceBehavior" name="SilverligtTest.Web.MyService">
<endpoint address="" binding="basicHttpBinding" contract="SilverligtTest.Web.IMyService">
</endpoint>
<endpoint address="mex" binding="mexHttpBinding" contract="IMetadataExchange"/>
</service>
</services>

Build your SilverligtTest.Web application

Consume data from WCF and display it in the datagrid of a silverligt application.

Right click on SilverligtTest application and click on "Add Service Reference".

When the Add Service Reference,then click on Discover .The service you created will be found. Before clicking OK notice that by clicking on the Service, the operation you created is discovered.


Clicking OK button adds the service to your project. You will access the Web Service (and its method) through this reference.

Open MainPage.xaml of SilverligtTest and create a grid an button on this page.

<UserControl xmlns:data="clr-namespace:System.Windows.Controls;assembly=System.Windows.Controls.Data" x:Class="SilverligtTest.MainPage"
xmlns="http://schemas.microsoft.com/winfx/2006/xaml/presentation"
xmlns:x="http://schemas.microsoft.com/winfx/2006/xaml"
xmlns:d="http://schemas.microsoft.com/expression/blend/2008" xmlns:mc="http://schemas.openxmlformats.org/markup-compatibility/2006"
mc:Ignorable="d" d:DesignWidth="640" d:DesignHeight="480">
<Grid x:Name="LayoutRoot">
<data:DataGrid x:Name="myDataGrid" AlternatingRowBackground="Beige" AutoGenerateColumns="True" Width="700" Height="500" Grid.Row="2" Grid.Column="1" CanUserResizeColumns="True"></data:DataGrid>
<Button x:Name="btnSubmit" Content="Submit" Height="30" Width="50" Click="btnSubmit_Click" ></Button>
</Grid>
</UserControl>

Now call the service Asynchronously.

Go to MainPage.xaml.cs and write the following code.

using System;
using System.Collections.Generic;
using System.Linq;
using System.Net;
using System.Windows;
using System.Windows.Controls;
using System.Windows.Documents;
using System.Windows.Input;
using System.Windows.Media;
using System.Windows.Media.Animation;
using System.Windows.Shapes;

namespace SilverligtTest
{
public partial class MainPage : UserControl
{
public MainPage()
{
InitializeComponent();
}

private void btnSubmit_Click(object sender, RoutedEventArgs e)
{
ServiceReference1.MyServiceClient obj = new SilverligtTest.ServiceReference1.MyServiceClient();
obj.GetAllEmployeeCompleted +=new EventHandler(obj_GetAllEmployeeCompleted);
obj.GetAllEmployeeAsync();

}

void obj_GetAllEmployeeCompleted(object sender, SilverligtTest.ServiceReference1.GetAllEmployeeCompletedEventArgs e)
{
myDataGrid.ItemsSource = e.Result;
}
}
}

Now its time to run your application .Press F5 to run.


Clicking on the button,you can see the output as follows


Now you can realize the interoperability of Silverlight ,LINQ and WCF.

2009-10-22

Introduction to Microsoft .NET Micro Framework (NETMF)

Introduction: The Microsoft .NET Micro Framework is a small and efficient .NET runtime environment used to run managed code on devices that are too small and resource constrained.

Scope :
Here is a scenario, you want to make a pocket-GPS-data-logger that saves position,acceleration, and temperature on a memory card. you also want to display some info on a small display. GPS devices send position data over serial port so you can easily write some code on the PC to handle that. But, a PC wouldn't fit in my pocket! Another problem is how would you measure temperature and acceleration on a PC? If you make this project using classic microcontrollers, like AVR or PICmicro, all this can be done but then you need a compiler for the micro you choose (probably not free), a week to learn the processor, a week to write serial driver, a month or more to figure out the FAT file system on memory cards...etc.Basically, it can be done in few weeks of work. If you have done this in the past, how was your experience with the IDE used for programming? Mine were all horrible, full of bugs and
debugging was near impossible!

Advantages of Micro Framework:
1).A memory footprint of about 300 KB; for comparison, the next smallest .NET implementation, the .NET Compact Framework running on Windows CE, needs about 12 MB Memory.
2).Supports common embedded peripherals and interconnects, including flash memory, EEPROM, GPIO, I2C, SPI, USB.
3).It runs on Microsoft's Visual C# express. Best IDE you will ever work with and it is FREE.
4).NET Micro Framework is open-source and free, in case you want to port it to your own hardware.
5)Many OEM devices are already available with .NET Micro Framework pre-installed.
6)Your code will run on all devices with almost on changes.
7)Full debugging capabilities. Breakpoints, stepping in code, variables...etc.
8)Has been tested in many commercial products so quality is assured.
9)Includes many bus drivers so using SPI, UART or I2C will require very little knowledge.
10)You almost never need to look at manuals or datasheets because of the standard framework.

System Setup:
Before we try anything, we want to make sure the PC is setup with needed software.
1.First download and install Visual C# express 2008 with SP1.(http://www.microsoft.com/express/vcsharp/)
2.Now, download and install .NET Micro Framework 3.0 SDK (not the porting kit).
http://www.microsoft.com/downloads/details.aspx?FamilyID=9356ed6f-f1f0-43ef-b21a-4644dd089b4a&displaylang=en

Devices that support MF:
Micro Framework is running on GHI Products. Microsoft has released the beta of .NET Micro Framework 4.0 and it is already ported to GHI Electronics .NET Product. Here is a quick review of Some Products:

A.ChipworkX Module/DevSys : If processing power and customization is needed then this is the right choice.ChipworkX runs a 200Mhz ARM processor with 64MB 32-bit SDRAM and 8MB for user
applications. It also contains a 256MB internal flash for file system storage. It includes all NETMF major features and adds all GHI exclusive features like WiFi and USB host support.
ChipworkX also adds SQLite database support and allows users to load their own native code
(C/assembly) on the device using RLP (Runtime Loadable Procedures). RLP allows for advance processor intensive and real-time applications.


B.Embedded Master Module/DevSys:
This small module includes all NETMF major features and adds many GHI exclusive features. On the software side: Filesystem, TCP/IP, SSL, Graphics, debugging and more NETMF features are included. GHI also adds: WiFi, PPP,USB host, USB device builder, CAN, Analog in/out, PWM and more. As for the hardware: It is 72Mhz ARM processor with 8MB SDRAM and 4.5MB FLASH. The processor on
Embedded Master contains Ethernet MAC built right in with DMA transfers, which gives it a large boost when compared with classical SPI-based Ethernet chipset used by other module makers.

C.USBizi Chipset: USBizi is the smallest and only single chip running NETMF in the world. The software running on it is a scaled down version of Embedded Master. It includes all features except networking (TCP/IP and PPP) and native graphics. Even though these features are missing, USBizi can be connected to a network using TCP/IP chipsets like WIZnet and can run simple displays. There are example projects already provided showing how USBizi can be networked and can display graphics.

D.FEZ Board: FEZ and FEZmini are very small boards targeted for beginners. They are based on USBizi chipset and so they have all USBizi features. Those little boards offer a lot of peripherals not available with any hobby-targeted board. Even tough it is targeted for beginner, it is a low-cost starting point for any professional wanting to test out NETMF.FEZ stands for “Freakin' Easy!”
Features available in FEZ but not available in Arduino, BASIC STAMP and others:
1. Base on Microsoft .NET Micro Framework.
2. Support runtime debugging (breakpoint, variable inspection, stepping...etc.)
3. Uses free VS2008 C# express edition for development.
4. High-end features like FAT, USB device and USB host
5. Hardware independent. Easily upgrade to more fancy hardware like ChipworkX.
6. Open source hardware design files.
7. Already available shields and holder boards.
8. Base on USBizi chip. Use the chipset to create new designs.

Create a Project:
Open Visual C# express and, from the menu, select file -> New Project. The wizard now
should have “Micro Framework” option in the left menu. Click on it, and from the templates,
select “Console Application”.


In Program.cs

using System;
using Microsoft.SPOT;

namespace MFConsoleApplication1
{
public class Program
{
public static void Main()
{
Debug.Print("Hello Avijit Da");
}

}
}
Press F5 to run and you will get following output:


To test the Project output ,we need devices like USBizi Chipset, FEZ and FEZmini Board, ChipworkX Module/DevSys or Embedded Master Module/DevSys. And these should be connected via USB,TCP/IP or Serial Port with PC.
And set the target devices from the project properties.


Deployment:
Before we use the hardware, let us make sure it is properly connected. The SDK comes with a software from Microsoft called MFDeploy(C:\Program Files\Microsoft .NET Micro Framework\v3.0\Tools\ MFDeploy.exe). This is good to make sure the device connected properly and transport with it has no issues.

If you get reply after pinging ,then start the deployment from Target->Application Deployment->Create Application Deployment.


Limitations:The platform does not support symmetric multiprocessing, multi-dimensional arrays, machine-dependent types, or unsafe instructions. The CLR is an interpreter rather than a just-in-time compiler, and uses a simpler mark-and-sweep garbage collector rather than a generational approach. Interoperation between managed and native code currently has a number of limitations. The .NET Micro Framework does not support any .NET languages other than C# at this time.

References:
http://www.microframeworkprojects.com/
http://www.ghielectronics.com/downloads/Beginners%20guide%20to%20C%23%20and%20.NET%20Micro%20Framework.pdf
http://www.microsoft.com/netmf/about/default.mspx

2009-10-18

Sql Server 2005 Mirroring within Workgroup or Domain without FQDN

Database Mirroring is a technology for increasing database availability. Database Mirroring transfers transaction log records from one server to another, allowing quick fail over to the standby server. In the event of a failover, client applications can automatically redirect their connection to the standby server. Fast failover with minimal data loss has traditionally involved higher hardware cost and greater software complexity. However, Database Mirroring can fail over quickly with no loss of committed data. In addition, Database Mirroring does not require proprietary hardware, and it is easy to set up and manage.

For Sql server mirroring you need atleast two Sql Server running on different PC.
First you have to configure Sql server for remote connections (in both the instances)so that it can accept incoming request from another SQL Server running on different PC.Follow steps 1-7.

Step 1.Open the "Sql Server surface area configuration".

Step 2.Click on the "Surface area configuration for services and connections"

Step3.Select "using both TCP/IP and named pipes"

Step 4.Be sure that the Sql Server Browser is running

Step 5.Click on "Sql server Configuration manager"

Step 6.Configure your Sql server instances.Put the IP address of your PC in the TCP/IP Properties

Step7.Restart your SQL Server Services.

Now create your database in your principal / First Server and take a full backup and restore it in other SQL server(Mirror Server/second server).Follow step 8 to step 10.

Step 8.Click on "Backup"


Step9.Take a full backup of your database.

Step 10.Restore your database with norecovery option in the mirror server


Step 11.Now its time for configure mirroring.Run the following code in the principal server.
--STEP 11.1: Run this on testServer1
USE master
--drop CERTIFICATE testServer1_cert
--drop master key
--drop endpoint Mirroring
--select getdate(),* from sys.certificates
--select * from master.sys.endpoints

CREATE MASTER KEY ENCRYPTION BY PASSWORD = 'y0ur$ecUr3PAssw0rd';
GO
--STEP 11.2:
CREATE CERTIFICATE testServer1_cert WITH SUBJECT = 'testServer1 certificate
for database mirroring',expiry_date ='10/31/2015',start_date='10/31/2008'
GO
--STEP 11.3
CREATE ENDPOINT Endpoint_Mirroring STATE = STARTED
AS TCP(LISTENER_PORT = 7024, LISTENER_IP = ALL)
FOR DATABASE_MIRRORING (AUTHENTICATION = CERTIFICATE testServer1_cert,
ENCRYPTION = REQUIRED ALGORITHM AES, ROLE = ALL);
GO

--STEP 11.4
BACKUP CERTIFICATE testServer1_cert TO FILE = 'C:\testServer1_cert.cer';
GO
--STEP 11.5: Copy C:\testServer1_cert.cer to testServer2(Mirror server) on C:\ drive

Step 12.Run the following steps in the mirror (testserver2) server.
--Step 12.1:
USE master
CREATE MASTER KEY ENCRYPTION BY PASSWORD = 'y0ur$ecUr3PAssw0rd';
GO
--STEP 12.2:
CREATE CERTIFICATE testServer2_cert WITH SUBJECT = 'testServer2 certificate
for database mirroring',expiry_date ='10/31/2015',start_date='10/31/2008'
GO
--drop endpoint Mirroring
--STEP 12.3
CREATE ENDPOINT Endpoint_Mirroring STATE = STARTED
AS TCP(LISTENER_PORT = 7024, LISTENER_IP = ALL)
FOR DATABASE_MIRRORING (AUTHENTICATION = CERTIFICATE testServer2_cert,
ENCRYPTION = REQUIRED ALGORITHM AES, ROLE = ALL);
GO

--STEP 12.4
BACKUP CERTIFICATE testServer2_cert TO FILE = 'C:\testServer2_cert.cer';
GO
--STEP 12.5: Copy C:\testServer2_cert.cer to testServer1(Principal Server) on C:\ drive

Step 13:Run the following steps again in the principal server
--STEP 13.1: Configure testServer1 for Inbound connections. Run this on
--testServer1.Principal Server
USE master

CREATE USER user1_mirroring
FOR LOGIN sa
GO

--STEP 13.2:Associate the certificate with the user
CREATE CERTIFICATE testServer2_cert
AUTHORIZATION user1_mirroring
FROM FILE = 'C:\testServer2_cert.cer'
GO


--STEP 13.3:
GRANT CONNECT ON ENDPOINT::Endpoint_Mirroring TO sa;
GO

Step 14.Prepare for mirroring. Run this on the MIRROR (testServer2) first before
doing it on the PRINCIPAL (testServer1,IP-192.168.1.11)
--Step 14.1
USE master
GO
ALTER DATABASE MRI SET PARTNER = 'TCP://192.168.1.11:7024';
GO

Step 15.--Prepare for mirroring. Run this on the PRINCIPAL (testServer1) after
running the previous script on the MIRROR (testServer2,IP:192.168.1.11)
--Step 15.1
USE master
GO
ALTER DATABASE test4 SET PARTNER =
'TCP://192.168.1.11:7024';
GO

Your server is now ready for mirroring.

Step 16.If you want to make testserver2 as a principal server run the following SQL in the testserver1

alter database test4 set partner failover

Step 17.Again If you want to make testserver1 as a principal server run the following SQL in the testserver2

alter database test4 set partner failover

Step 18.if your testserver1 is running as principal server and suddenly it is stopped and you want to recover data from Mirror server(testserver2) run the following code in the mirror server.

alter database test4 set partner off
restore database test4 with recovery

Now you understand how it is easy configure mirroring in sql server 2005 with the IP address whether it is in workgroup or in domain.

2009-10-06

Display Image in gridview and export it

<asp:GridView ID="grdQuestion" runat="server" AutoGenerateColumns="False" >
<Columns>
<asp:TemplateField HeaderText="Q_No" SortExpression="QuestionID">
<ItemTemplate>
<asp:Label ID="lblQuestionID" runat="server" Text='<%# Bind("QuestionID") %>'></asp:Label>
</ItemTemplate>
</asp:TemplateField>
<asp:TemplateField HeaderText="Question" SortExpression="Question">
<ItemTemplate>
<img id="Imagebinary" runat="server" src='<%#Bind("Imagebinary")%>' alt="" style="width:50px;height:50px" />
</ItemTemplate>
</asp:TemplateField>

</Columns>
</asp:GridView>


DataSet ds;
DataSet objDataSet=new DataSet();
ds=("select Query which will return QuestionID and Imagebinary,In the Sql Srver 2005 table the datatype of QuestionID is string and Imagebinary is varbinary(max))

DataTable objDataTable = new DataTable("GridDetails");
DataRow objDR;
objDataSet.Tables.Add(objDataTable);
objDataTable.Columns.Add("QuestionID", typeof(string));
objDataTable.Columns.Add("Imagebinary", typeof(string));
for (int i = 0; i < ds.Tables[0].Rows.Count; i++)
{

objDR = objDataTable.NewRow();
objDR["QuestionID"] = ds.Tables[0].Rows[i]["QUESTIONID"].ToString();
objDR["Imagebinary"] = Request.Url.ToString().Substring(0, Request.Url.ToString().LastIndexOf("/") + 1) + "QuestionImage.aspx?ImageName=E&QuestionID=" + ds.Tables[0].Rows[i]["QUESTIONID"].ToString();
objDataTable.Rows.Add(objDR);
}


We have a QuestionImage.aspx page where actually I am calling a Storedproc that return Imagebinary against a QuestionID(getting from the query string)

Following is the server side coding of QuestionImage.aspx

using System;
using System.Data;
using System.Configuration;
using System.Collections;
using System.Web;
using System.Web.Security;
using System.Web.UI;
using System.Web.UI.WebControls;
using System.Web.UI.WebControls.WebParts;
using System.Web.UI.HtmlControls;

public partial class Admin_QuestionImage : System.Web.UI.Page
{
protected void Page_Load(object sender, EventArgs e)
{
if (!String.IsNullOrEmpty(Request.QueryString["ImageName"].ToString()))
{
byte[] image=null;

if ((Request.QueryString["ImageName"].ToString() != "") && (Request.QueryString["QuestionID"].ToString() != ""))
{
using (QuestionBLL objQuestionBLL = new QuestionBLL())
{
QuestionBO objQuestionBo = new QuestionBO();
objQuestionBo.QUESTIONID = Request.QueryString["QuestionID"].ToString();
objQuestionBo.IMAGEBINARY_EH_INDICATOR = Request.QueryString["ImageName"].ToString();
objQuestionBLL.getQuestionImage(objQuestionBo);
image =(objQuestionBo.ResultDS.Tables[0].Rows[0]["IMAGEBIN"].ToString()!="")?(byte[])objQuestionBo.ResultDS.Tables[0].Rows[0]["IMAGEBIN"]:null;
}
}
if (image != null)
{
Response.ContentType = "image/jpeg";
Response.BinaryWrite(image);
}
}
}
}

Export the gridview data:
If you are trying to export the gridview data to excel,you can probably get a problem i.e the images will be overlapped.So better to export the gridview (that contain images) to the MS Word.

Code for exporting gridview to doc
string fileName = string.Empty;
HtmlForm frm = new HtmlForm();
this.Controls.Add(frm);
{
frm.Controls.Add(grdQuestion);
frm.Controls.Add(tblExcelFirst);
fileName = "StudentAns" + System.DateTime.Now.ToString("ddMMyyyyHHMM");
}

Page.Response.Clear();
Response.AddHeader("content-disposition", string.Format("attachment;filename={0}.doc", fileName));
Response.Charset = "";
Response.ContentType = "application/vnd.word";
StringWriter stringWrite = new StringWriter();
HtmlTextWriter htmlWrite = new HtmlTextWriter(stringWrite);
frm.RenderControl(htmlWrite);
Response.Write(stringWrite.ToString());
Response.Flush();
Response.End();

Disable cache for Popup window in asp.net

Add a timestamp querystring variable to the URL of the dialog content - number of ticks since 1/1/08 or something - IE will treat it as a new page and ignore the cache.

url = "<Some url with query string>"
var date = new Date();
window.showModalDialog(url + "&" + date.getTime(), ... );

2009-10-01

Delete all files from a folder

using Syste.IO;

Array.ForEach(Directory.GetFiles(Server.MapPath("..\\StudentImages\\")),
delegate(string path) { File.Delete(path); });


NB.Only change the blue color portion

Generate random numbers in T-sql

SELECT CAST(CAST(NEWID() AS BINARY(15)) AS INT)
or
SELECT SUBSTRING(CAST(CAST(CAST(NEWID() AS BINARY(15)) AS INT)AS VARCHAR),2,7)